🗓 Date Ranges in Drupal 10/11 Using Custom Twig

Event start and end dates conditional display

🗓 Date Ranges in Drupal 10/11 Using Custom Twig

When building event listings in Drupal 10 or 11, getting the date display just right can make a huge difference in readability and user experience. The default Views output for date or daterange fields can sometimes be clunky or repetitive—especially for events that start and end on the same day.

Out of the box, you have three options:-

  • Display start date,
  • Display end date, or
  • Display both start and end date.

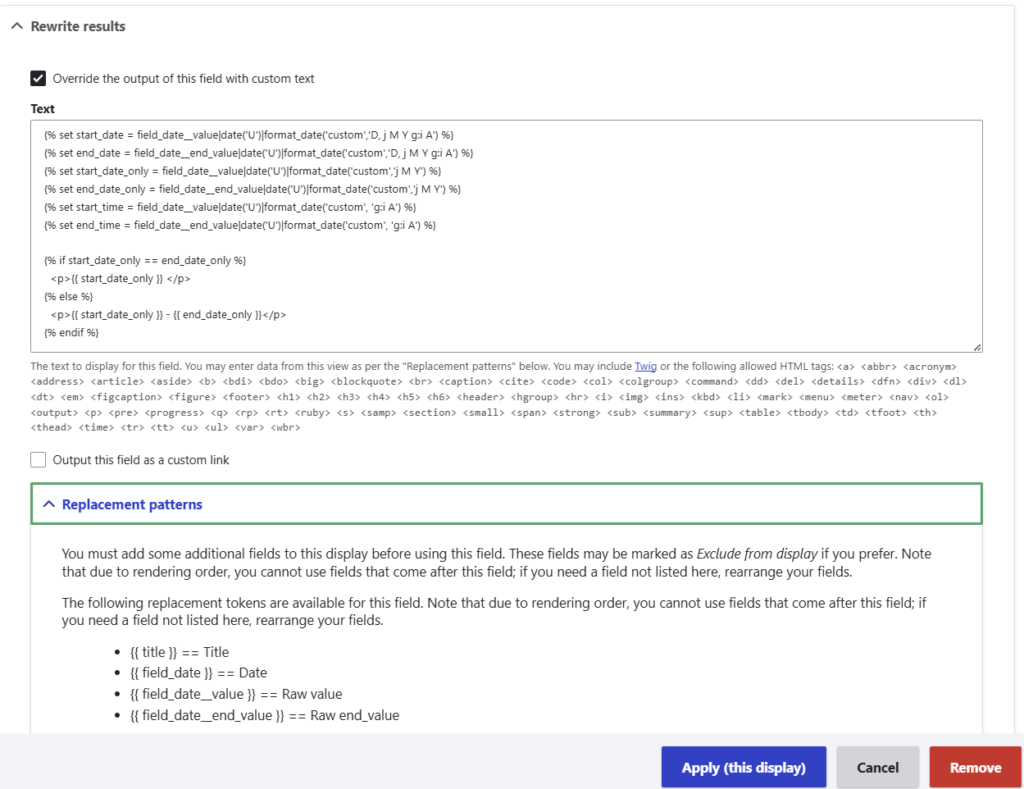
In this guide, I’ll walk you through how to override the output of a date field in a View using custom Twig code—a clean, theme-friendly way to format start and end dates without writing a custom module or modifying templates.


🛠 What We’re Aiming For

Instead of this default output:

Fri, 4 Apr 2025 10:00 AM – Fri, 4 Apr 2025 12:00 PM

We want a cleaner version like:

Fri, 4 Apr 2025 10:00 AM – 12:00 PM

And for events spanning multiple days:

Fri, 4 Apr 2025 10:00 AM – Sat, 5 Apr 2025 3:00 PM

All from within the View UI, using Twig.


Step-by-Step: Use Custom Twig in Views Field Output

Step 1: Open the View

  1. Go to Structure > Views.
  2. Find your target View (e.g., “Upcoming Events”) and click Edit.

Step 2: Add or Locate the Date Field

  1. In the FIELDS section (middle column):
    • If your date field (e.g., field_date) is already present, move to the next step.
    • If not, click Add, search for it, check the box, and click Add and configure fields.

Step 3: Configure the Field

  1. In the FIELDS list, click directly on the field name (e.g., field_date) to edit its settings.
  2. Make sure the Formatter is set to Plain.
  3. Make sure Display is set to Display both start and end dates.

Step 4: Override the Output with Custom Twig

  1. Scroll to the section titled Rewrite results.
  2. Check: ☑ Override the output of this field with custom text
  3. A textarea labelled Text will appear.
  4. Twig is enabled by default in the latest versions of Drupal.

Step 5: Add the Twig Code

Paste the following into the Text box:

{% set start_date = field_date__value|date('U')|format_date('custom','D, j M Y g:i A') %}
{% set end_date = field_date__end_value|date('U')|format_date('custom','D, j M Y g:i A') %}
{% set start_date_only = field_date__value|date('U')|format_date('custom','D, j M Y') %}
{% set end_date_only = field_date__end_value|date('U')|format_date('custom','D, j M Y') %}
{% set start_time = field_date__value|date('U')|format_date('custom', 'g:i A') %}
{% set end_time = field_date__end_value|date('U')|format_date('custom', 'g:i A') %}

{% if start_date_only == end_date_only %}
  <p>{{ start_date_only }} {{ start_time }} - {{ end_time }}</p>
{% else %}
  <p>{{ start_date }} - {{ end_date }}</p>
{% endif %}

💡 Replace field_date with your actual field machine name, if different. The correct token names will be listed below the textarea.


Step 6: Save and Preview

  1. Click Apply to save the field configuration.
  2. Click Save on the View itself.
  3. Go to the front end and check your View display. You should see event dates nicely formatted:
    • For same-day events:
      “Tue, 1 Apr 2025 10:00 AM – 12:00 PM”
    • For multi-day events:
      “Tue, 1 Apr 2025 10:00 AM – Wed, 2 Apr 2025 2:00 PM”

Troubleshooting Tip: Check Output

If you don’t see anything rendered, try a simple output test:

<p>Start: {{ field_date__value }}</p>
<p>End: {{ field_date__end_value }}</p>

This helps verify the correct field names before adding date formatting logic.


Why This Works

Drupal Views gives you powerful control over field output via Twig. By using the |date('U') filter and format_date(), you can safely and flexibly format date values—even compare start and end values to conditionally simplify output.

This method:

  • Requires no custom modules
  • Keeps your logic self-contained in the UI and View config
  • Produces clean, semantic HTML

Final Thoughts

This Twig-based approach is perfect for site builders and themers who want better control over event displays—no PHP required. It’s flexible, readable, and native to Drupal.

Have a variation you use, or want to build on this with i18n support or schema markup? I’d love to hear about it—drop a comment or get in touch!

Subscribe

Please enter your details below to be notified of product releases and announcements.